I have a small problem... ok... it's a big problem. I. Love. Stripes.
Until now my stripe obsession has stayed safely within my wardrobe.
And seriously... It is quite a striped wardrobe. If it had stripes or pockets it was in my basket much to my bestie Megan's horror.
Yet, with a new house comes endless possibilities.
My stripe love didn't have to stay within my clothes... my windows needed some stripe love too!
Now on Pinterest you will see tons of do it yourself stripe curtains that are all about painting. You basically take a pair of Merete Curtains from Ikea ($24.99) some paint, painters tape and a few hours and they have beautiful striped curtains.
Logically if someone else can do it... of course I could give it a shot right?
I first decided I wanted to have red striped curtains after seeing this stunning photo from the Better Homes and Gardens website:
Since my living room accent color was red and eventually the walls will be painted Benjamin Moore's Revere Pewter I thought it would look fantastic!
I dragged sweet love of my life Bryan to Ikea (joys of living in Texas now) and bought about five packs of those Merete Curtains since I planned on making quite a few curtains... eventually. Yet, as I began to explain my plan to Bryan about how to achieve these amazing (and of course EASY) curtains he sweetly pointed out a few holes in my plan... as only an engineer could.
1. I don't know about you but I have never painted a perfect stripe that didn't bleed... it is not my skill.
Amplify that bad skill by ten on curtains that you can't get paint out of if you mess up... Let's just not think about it.
2. Everything I do my 22 month old son Elliot NEEDS to help me with. He has this urge in him that if it looks like I need help he has to get right in it and help and combining that with paint... yea. Plus there was no way I could complete these bad boys while he napped. Unless I did it for a week and who wants open paint around your house for a week??
3. He just bought me a brand new Brother sewing machine... couldn't I just sew them?
DING!
Why couldn't I sew them? I love to sew! I do a semi-decent straight line... Let's do that!
First I pulled out my curtains. I used two packs which equaled four panels since I had a big window space to cover. (Three windows in all) I threw them in the wash so they would shrink than ironed them when they popped out of the dryer. Laid them over a banister to keep away wrinkles and figured out how wide I wanted my stripes.
I wanted four large red stripes so we figured a 16" stripe would be wide enough since Merete Curtains are 98" long. After they were washed they were about 96" which divided by 16 was now an even 6. Awesome. Now each panel after washing shrinks to 54" wide.
At this moment I would love for you to learn from my mistakes and trust me... I made them. And the first way to do it is when you are buying your fabric.
First let me tell you the breakdown:
To make 16" stripes on Merete Ikea Curtains you need to cut your fabric to this measurement for each stripe:
17"L x 57"W
That is putting a ½"on each side of your stripe to iron the hem plus almost an inch on each end of your width to fold it over the edge of the curtain and sew. Got that? This always trips me up...
I found a red fabric that matched my accent sofa pillows. Now being married to an engineer becomes super helpful in this situation because the minute numbers come into sewing I panic like an indecisive chick at Starbucks. The red fabric I choose was only 36" wide so I had to go 57" deep and got two panels for each 57". Now, if you are smart you will have the nice people at Jo-Ann's cut your fabric to 57" so than all you have to do is cut the 17" panels. (To do two panels you need 3 - 57" cuts and it will make 6 stripes) Because cutting fabric is never super easy. It's doable but not always perfect, that's why you give yourself the extra around the edges.
I had them cut me all the fabric they had. Again cause I wasn't number savvy I had them cut it at 7 yards than 3 yards because they had to use two separate bolts. Stupid. I lost a 57" stretch in there between the 7 and 3 yards so I had to go buy more fabric. Fail. I was trying to use my Jo-Ann's coupon which didn't work anyway so from now if the fabric is already on sale I am just going to have them cut it to the measurements I need and save myself an hour of cutting.
| PRICECHECK: |
I bought about $80 worth of red fabric plus two Merete Curtains that came to $50.
To make my four panels it cost a whopping $130. Ouch.
Yet, considering I couldn't find these suckers anywhere and the cheapest ones on Etsy are $175 PER panel or $260 per set... I AM AWESOME and saved $570 and $390 respectively!! It is so important to put that price check in perspective throughout any project you undertake. It helps you sail through any speed bumps you may encounter. And knowing me... I am going to hit some.
Once you have all your fabric cut you need to iron the hem on the stripes. I use this awesome idea from Martha Stewart (Oh Martha) that helps me make sure I am making a ½ hem. Ironing in relation to sewing is the ONLY time I enjoy ironing. It's instant gratification. Wrinkles be gone!
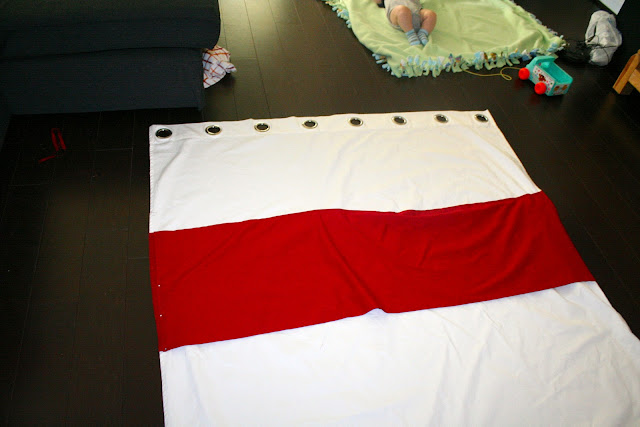
I laid out my ironed hem on my curtains and measured 16" down under the grommets. My husband and I thought we shouldn't count those four inches that contain the grommets. You should. It doesn't look bad but technically my first white stripe is now 20" and not 16". In the end it did add an extra 4" to my curtains which made them taller so that was an unexpected bonus. But the next time I do this... I'm going to include the 4" grommets in my measurements.
At first I tried to cheat on this project and just pin the ends of the fabric (Horizontally) and not all the way around. Who really has all that time to pin? This is what happened after I ran it through my sewing machine than laid it down to admire my handiwork...
You can laugh. I did.
So I ripped that out and pinned the WHOLE thing. What I did was pin the top and the bottom of the stripe but NOT the sides. They shift a bit anyway when you sew so there is no point.
You have to lay down your stripe and go across the curtain with your ruler to make sure it's the right measurement all the way across. Don't be lazy on this! If you feel like being lazy look again at the picture above and let that inspire you.
Sewing Tip:
I have a regular Brother sewing machine and stuffing all that fabric in that tiny four inch whole... yea that ain't gonna cut it. After my massive fail above I figured out I should fold the curtain at four inches so the excess can fit in my little brother space. This will help you slide it through without shoving all the fabric in the little hole. Looks kind of like this:
I measured between each red stripe 16" and pinned. After some sewing and more ironing I had my first completed panel!!
P.S. These won't fit on your ironing board... joy.
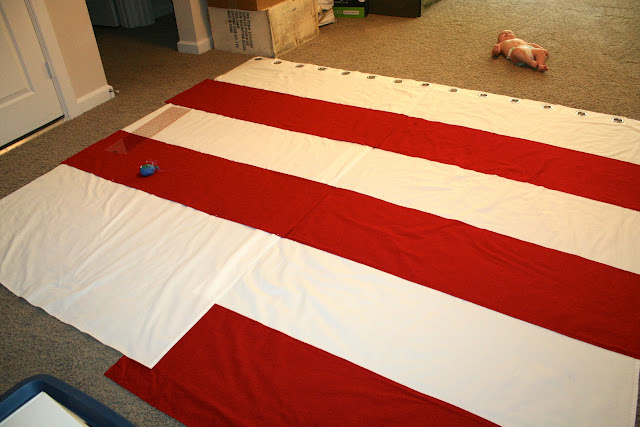
Now with one completed panel I took that upstairs, laid it down and used it as a reference to match up all my remaining panels. They needed to match semi-perfectly or they won't measure up when you hang them and having zig zag curtains when you weren't going for that effect will just depress you every time you pass them.
Look I even caught a cute baby in the picture!
This is a great picture. It shows you my extra four inches that were added by the last stripe. But it also shows you how you need to match them up. I laid them together and took out my ruler and started measuring. The first stripe was a perfect 16" under the grommets.
The second stripe... was 15 ⅝". Not really sure how that happened... but it didn't matter cause now they all were gonna be like that. You can't tell they aren't perfectly 16" can you? We couldn't either.
The third stripe by the way was even worse... it was 15 ½ down. Bahahaha.
Now this project... it did take me awhile. Like probably over two weeks but that was because I stop when my husband or kids want to play. If I would have pushed on with no distractions it would have taken probably a full day to do all four panels. But what fun is that?
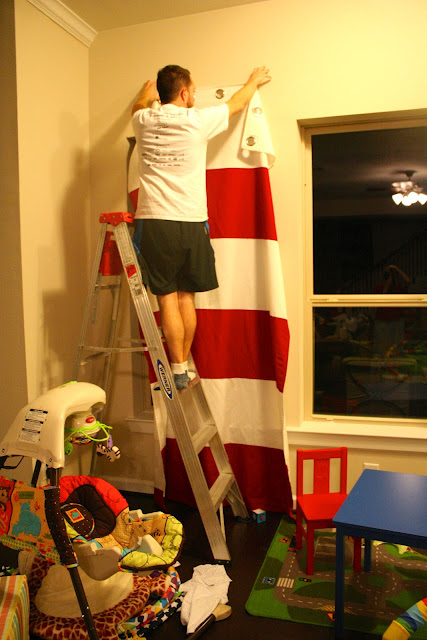
After they were finished I had my sweet hubby hang them up. This was him trying to figure out how high he needed to hang the curtain rod.
I sent a demo photo to my sister who immediately panicked and thought I was putting Dr. Seuss curtains in my living room.
I showed her my inspiration photo and she felt a bit better... but it wasn't until I showed her the completed project that she believed I wasn't crazy. She and I have polar opposite tastes by the way so any kind thing she says about my decorating is a HUGE WIN. ;)
So, there you have it. It isn't anywhere near being a completed room but the curtains give me a great start. Plus I fall in love with them every time I pass them which is always the mark of a great project. Do they have a few messed up edges and not so straight lines? Of course... but that's the character of it.
And for $130 bucks... it's still a fantastic deal my husband can be proud of.
Hope this helps! If you have any questions don't hesitate to ask!
God Bless,
Jessica


Love this! It's like I'm there. Thanks for giving me a glimpse into your life! Much love to the McCartys!!!!
ReplyDeleteThey look awesome! I plan to do this for my sons room. Great tips too!
ReplyDeleteIt will look awesome! You'll have to send me pictures. ;)
DeleteWhat color thread did you use to sew the red panels to the ikea curtains?
ReplyDelete