Hello New Year.

2012 was an awesome big year of Intense-ness for we McCarty's.


Let's do a quick re-cap shall we?

We started off 2012 pregnant with our second child... Another boy! :)


Had to take Elliot to Disneyworld so I could tell him at least once he got his own trip.
He wasn't too impressed...


Found out Valentines Day that Bryan got a new job! After a few years of praying for a new position he was scooped up to work in.... The Woodlands, Texas.


So... we built a house, had a baby and left all of our family and friends and headed out west.


But we have been so blessed to met new friends and find a new church home in
The Church at Alden Bridge.


Re-newed our vows in an Irish Wedding


Elliot turned 2 and Ethan got huge


And we also had a few emotional breakdowns... and some days we find ourselves still adjusting.

Having two children was a huge adjustment for Bryan and I. While we love both of our boys and planned on having them that close... We didn't realize how spoiled we were with our friends back home lovingly watching our children so that Bryan and I could spend some time together. I've always known that I need my best friend to keep me sane... I didn't realize Bryan needed me as much as I needed him though to keep him sane!

Yet... we are to

Count it all joy, my brothers, when you meet trials of various kinds, for you know that the testing of your faith produces steadfastness. And let steadfastness have its full effect, that you may be perfect and complete, lacking in nothing.      [James 1:2-4]

We could have easily thought we weren't right for parenting when often we had days where our two children won against us. We could have also started to resent our sweet little blessings when they prevented us from being together and do things like to go movies or out to dinner like we use to.

But through it all at each turn we were constantly reminded whether by family who lovingly kept traveling to Texas to give us date nights... by friends who called to encourage us when we were weary or by solid Truth:

“I will never leave you nor forsake you.” So we can confidently say,
“The Lord is my helper;
I will not fear;
what can man do to me?”    [Hebrews 13:5b-6]

Therefore, since we are surrounded by so great a cloud of witnesses, let us also lay aside every weight, and sin which clings so closely, and let us run with endurance the race that is set before us,looking to Jesus, the founder and perfecter of our faith, who for the joy that was set before him endured the cross, despising the shame, and is seated at the right hand of the throne of God.  [Hebrews 12:1-2]

That even when we failed as parents... failed to romance one another... failed to read our Bible and pray... God was still faithful to us. His grace was still sufficient. His love was still unending. 


So, while we look back on 2012 as a HUGE year of fun changes and a bit of intense-ness... we are super excited that through it all we are again reminded how faithful and loving our God is.

We aren't the first to know that truth and know we will not be the last:


I will sing of the steadfast love of the Lord, forever;
with my mouth I will make known your faithfulness to all generations. [Psalm 89:1]


No matter what 2013 brings for you and your family know that God will always be Faithful.

Happy New Year from our Family to yours.


Looking forward to many more adventures in 2013! 


Jessica

A Christmas Mantle

I never grew up dreaming about being a home maker and I certainly never dreamed about decorating my home. In fact the more I think about what I didn't dream about... I wonder what I was dreaming and thinking about.

Whatever it was... it certainly cannot compare to what did happen in my life.

Loving husband, two perfectly healthy boys and a place to call our home. For some odd reason too... my husband lets me decorate that home he lovingly built for us.

When Bryan and I got married we always associated Christmastime with warm fires. In Louisiana you really don't have many nights you actually need a fire... So, he bought me the lame Fire DVD for Christmas one year and I bought him a real fire pit to help his manly, "Must light Fire" mentality but he's always wanted a real one in our home. So, when the option was available on our new casa it was a no-brainer.

It was one of the first things that we recognized during construction:


The first thing we played with before we moved in...


And the one place I felt most excited about decorating. It isn't much... and the rest of the house isn't even close to being done but... what do you think?


Does it feel like Christmas to you? (the fire helps doesn't it?)

It does to me!

We have our beautiful stockings. Ethan's just came in yesterday!
[Ours are from Etsy and the boys are from Pottery Barn]

Two giant sacks of toys [bags courtesy of a Target Gift and Amazon gift that I've held onto over the years. I stuffed them with the boys stuffed animals. They haven't missed them yet.]

Bought the greenery, cinnamon sticks, red holly and N E L letters at Hobby Lobby. (All there stuff is 50%) The O is a small wreath from Hobby Lobby as well. I was inspired by this Pinterest Photo:


Yet, made my own version. It's super easy too:


For the N I spray glued it than laid burlap over it. Cut the excess and taped on some small Christmas greenery. I spray painted the E white, the L gray and than sprayed glitter paint on them and the Wreath and VOILA! Noel.

The beautiful vintage mirrored window/door/whatever is from a Flea Market in NOLA. I haggled it to $10 with my bestie Megan F. I may turn it into a chalkboard one day but I thought it was beautiful the way it was... and for those who were reading my Facebook... that window is the one I was sanding and than realized it may have lead paint but I haven't died yet so I guess I'm good. ;) I'm sure you enjoyed my freak out about it though so you are welcome.

The Merry and Bright sign I bought from Goopdeals.com. It was one of their sales a while back.

I think for my first attempt at a Christmas Mantle it came out well... definitely looks too pretty to be something I put together!! But perhaps it may be the start of more pretty things to come...

Happy Holidays.

God Bless,


 Jessica


DIY Quick Christmas Decor: Trees in a jar


It's December and I am having some mad Christmas decorating spirit!

So, here is a super easy craft you can do today that will bring some Christmas Cheer the rest of December! 

If you are like me, your husband has by now questioned why you collect junk.
I do. I collect glass jars, old picture frames and random pieces of interestingness that I know one day I may be able to turn into something.

Today could be a great day for you to turn that “junk” into something!

I got some glass jars I had lying around that I’ve collected over the years.

All you need are:
    
                Glass Jars
             Epsom salt
                  Small trees 
     (Trees they normally use in like Santa village displays. I bought mine at  Michael’s when they were
     50% off. I got like 21 one of them so go in with a friend and save even more bucks.)


 My mom taught me to decorate in three’s so I used a large hermetic jar I got from a thrift store for $1 (I saw them at World Market though for $10), a glass spaghetti jar and a glass gravy jar.


Each were cleaned, (Goo Gone be some miracle stuff people!) placed some little trees in and dumped some “snow” on them.

And voila! Instant Holiday décor that takes less than five minutes to put together but brings a smile every time you pass it. Hubbies usually like it too and it helps them know you aren’t just collecting junk to collect it… but that you can make beautiful things out of it.

Happy Holidays!

God Bless,


Jessica

A Real Christmas Tree

On my way to a flea market a few months ago I saw a sign for a Christmas Tree Farm.
I thought those only existed up north or in the movies.

You can imagine my excitement that they actually were real and one was within range!!

See, growing up we had beautiful artificial Christmas Trees and no one can decorate a tree like my momma... except maybe Martha Stewart but her tree doesn't have the warmth ours did growing up.

Now there is nothing wrong with artificial Christmas trees and after this Christmas I may find out their mass appeal as I lug a dead tree out my house.

Yet, when I told my in-laws though that we'd never had a real tree they decided one day I should and bought me my very own Christmas Tree in 2009.


We planted it and planned to cut it down one day and use it as our first real tree!
Sadly though, when we moved to Texas we had to leave our sweet Christmas Tree behind.


But being Bryan... he wouldn't let my real Christmas tree dreams die. Even though this year we actually won't even be here for Christmas... He looked up that tree farm and off we went!!


I think we walked their entire farm looking for the right tree.
I was kinda picky... we were looking for a Leylend Cypress like the one we had in our backyard yet for the life of us couldn't find one. That's because we were in the Virginia Pine section... on the hayride back with our beautiful pine we found the Cypress section... whoops

But when I saw this little guy I knew it was the right one. It looked even better when I put some good looking men next to it...


TimBER!! 


Next thing you know we had it chopped down and put up in it's new home!


Beautiful isn't he?
We just added some family memories with a little help from Elliot (who only broke one ornament by the way... kudos to him!) and our new tree found it's home!


I think it's going to be a very Merry Christmas!


God Bless!


Jessica

Operation: Knock Hubby's socks off


If you’ve known me for any length of time you know I’m pretty madly in love with my hubby Bryan McCarty.  That in itself is a miracle since I was never one to dream of weddings and having a family... but when I met Bryan he made all that girly being a wife and having babies thing look pretty awesome if he was part of the deal. So, when he asked I screamed yes and the rest has been the most awesome adventure of my life. 

When we first got married if you came over to my house or called I was usually doing something crazy for my man. 

Whether I was building a fort in my living room, secret cookie bandit trips to his office to outright kidnapping him from work and putting him on a plane, I seriously delighted in romancing Bryan’s socks off.

I learned that early in life from my own parents. My mom is deeply in love with my dad and everywhere we went from the grocery store to even home depot she would always be asking, “What could I get your dad?” And my dad was just as awesome as he’d go out of his way to bring her things from his trips… sometimes even a rock and let me tell you, my mom would get super excited about that rock.

It didn’t take much because sometimes the whole point of gestures whether large or small is the fact that you thought about someone enough to do it.

While my grand gesture days of putting Bryan on a plane to Disney World may require a heck of a lot more planning now with two little dudes running and drooling around I learned lately the vast importance of the small gesture.

I’ve been dropping the ball big time lately in the romance department and while I can make excuses that we were moving, I’m trying to make our home or that I have two crazy children that need constant supervision since they are exactly like me... there really was no excuse that I couldn’t take five minutes to show Bryan how much he meant to me.

While Bryan may have not noticed I was dropping the ball I sure was and it was making me feel that he did not know how much I loved him. This came to a head when on our fifth wedding anniversary, where once upon a time I had grand dreams of a great gift for him… all he got was a hand written note at 11:30pm that night as if it was an afterthought. (um... cause it was. In fact he was the one who gave me the idea... SHAME SHAME SHAME!!!) 

I cried for days after.

After days of whining to him that I was sorry and how I’ve been such a bad wife I finally got off my pity party bus and pulled up my trusty friend Pinterest. I sat Elliot in front of Word World, put Ethan in an exersaucer and started my plan! It didn’t need to be huge… it just needed to show him that I purposefully took time to show him that he above everyone else in the whole world is my one and only.

Each of these little gestures took less than half an hour to do and that half an hour can mean the world to a man. When I use to have a bunch of single friends and they’d come over to hang out I’d inform them quite confidently that men are like girls. They need constant love and affection and they do. A wife has a very special role… we can make or break our man. The way we treat him greatly affects him and his life. If we cut him down constantly or nag him he eventually will draw away from us and think badly of himself and us. If we build him up though and show him how truly we appreciate all he does for our family… he can soar.  

We need to be women that when our husband leaves he is sad to go and super eager to return to our arms.

He happened to be out of town while this “Operation Knock Bryan’s Socks off” went down so I thought the best way to start was to assault him with love before he even got out of the car. So I rolled out some wrapping paper on my kitchen island and painted him a sign than went WAY out of my “clean” comfort zone and let my children put their hand and foot prints on it. We taped it to the front of our house about the time all our neighbors were coming home and got many thumbs up of approval.


Next I ran out to our local Party City and got six balloons. One red one for Elliot that he promptly popped when he got home and five heart shaped balloons that I was going to attach my favorite memory for each year we’ve been married. 


I placed them on our bed for him to discover and went on to my next project.


Prettiful Designs wrote a post about “Seven Days to knock your husband’s socks off”. That was right up my alley so I decided to do it. Majority of those things I’d done for Bryan so if I subtly did it… he wouldn’t notice. If I made a point of it though it made it special! I designed a quick day by day print out, “Fun Friday”, “Sweet Treat Sunday” ect… and piled some games on the kitchen table with the “Fun Friday” Label than I let him discover everything on his own. I have all the other day labels and when he least expects it I'll pop them on him. 


It was small but as I watched him rush around the house and experience each one I could see the light on his face like a kid on Christmas morning.

It reminded me I have the world’s most important job in being his wife and it’s a job worth putting a lot of effort into. 

Have you knocked your hub’s socks off lately? If not, what are you sitting reading this for?!?! Go out there and take that moment to tell him how much you treasure him and all he does for you.

He deserves it. And on the off chance he doesn’t… loving him like this will make him a man that will soon very much deserve it. Trust me.

God Bless!


Jessica

Project: Kitchen Dry Storage Jars


I've wanted to do this project since March. That is a long time to desire to do a project and especially one as easy as the Painted Hive, who wrote it made it look.


A lot of factors were stopping me from my project though... like being pregnant, in the middle of moving to a new state and the all important no supplies or room to keep said project once finished.

 Yet, now after seven months I have solved all of those issues, made my beautiful jars and than had the, "Oh..." moment. Not the, "Oh this is fantastic!" but the "Oh, I could have done this much easier and cheaper and they also are much smaller than I thought" oh moment.

 ...But I still love them!! :)

Lately I've been finding that each project I do as soon as I finish someone pins on Pinterest the same exact project yet a ton cheaper and always way easier. Like, while I was nesting I decided to make floor pillows for Elliot so he could watch Sesame Street. $150 and two weeks of my time later I have two awesome floor pillows and a day later someone pinned on how to make them for $30. Than when I finished my awesome-I'm-still-madly-in-love-with-them Red Stripe Curtains some stranger pinned THE NEXT DAY how to make them for $10. Whatever... mine are better.

Oie... It's getting to be comical now. But on to the project and my experience with it so if you decide to have these love-erly amazing jars like I did you may hopefully do it faster and cheaper.

First I bought all my Ikea SLOM jars. Adorable little things and very reasonably priced. (Did just find out this morning World Market has these jars for the same exact price as well so if an IKEA isn't in your geographic area than skip the Sweedish store and head over to World Market, it's cooler over there anyway.)

Now they look like a very good size but for my purpose I didn't want just something beautiful I wanted it to be functional storage as well so that I wouldn't have beautiful glass jars and a half empty sack of flour lying around. Well... that didn't happen. The medium size jars hold about half a bag of regular size brown sugar and the large jars hold about 3/4 a sack of flour. Fail.

My love said it best:

Bryan: "So you bought these for storage yet they don't contain the whole thing... good job baby." 

Boo. Moving on...

After I bought all my jars and washed them out I bought the supplies I needed from the supply list. Now... I'm cheap. I can't help it but I figure if I can skimp a little here I'll have a little more there to make more projects! This thinking has yet to not bite me in the behind... one day I may learn. Probably not though...

YET this one time... it actually didn't matter. Because I don't wash my storage jars every other week I didn't think I needed them to be iron clad waterproof. Bryan would be miffed if I put these suckers in the dishwasher anyway so handwashing is fine with me. Plus I did find out that you'd need to scrub super hard to even make a dent in these to get them off... how I know that may have been because I accidentally labeled the wrong jar but there is no photographic proof I did that so... it didn't happen.

I purchased these waterslide decals from Ebay and skipped out on getting the fancy Magic Decal paper since it was like $30 a pop for five sheets. I mean it can't be that magical... Plus I would have needed a laminator and that would have been another $30 and at the end of the day if I'd a spent $70 bucks on labels for jars that didn't store very much... I would have been a very unhappy thrifty momma.

In order to save that $70 I had to do some tweaking to the Painted Hive's free printables. I'm semi-good at graphic design, I love to design my own invitations and logos and such so I thought this would be a snap. It sort of was... between the three episodes of Seasme Street and Word World I had to watch with Elliot (cause he likes to sit on my lap) plus two sickly kiddos it just took a little longer than expected.

I had to horizontally flip the image to print it as a mirror image to use with the waterslide decals. The magic decal instructions allowed you to print them normally. Now flipping an image horizontally can be very simple. I use a program called Pixelmator that was like $12 that I design everything with. It has a simple button and BAM you are done.

It took me forever to find that button and even longer to turn the PDF into an image that I could actually flip. PDF's are awesome. So hard to work with if you actually DO NOT want them to be a PDF.

The short version? Right click on the PDF file and choose "open with..." I had the option to choose Pixelmator and opened the entire project there, flipped it, saved it and printed it. That five minutes took me three hours... I imagine you wonder at this point why I even bother with doing crafts but it's still all fun and one day I'll look back on these and laugh as hard as you are right now.

So! Now I have my decals, my jars, my Clear Acrylic Spray paint (from Michaels cause Home Depot didn't have that stuff) and I'm ready! I even ordered the cute wooden scoops! Yet... About those scoops. Yea... you should check the size of those suckers before you buy them, a photo below will explain why. It would take me a good twenty minutes to get a cup of flour using those things...


I followed the instructions that came with my decal papers. I took my two sheets outside, sprayed them with a nice coat of Clear Acrylic and let it dry for 40 minutes as instructed.

After sufficient drying (I actually waited) I cut out my piece carefully, had my bowl of warm water, dropped it in there and watched all the ink come off..............

That obviously was not supposed to happen. Looked back at my instructions and tried to find what I had missed... I had printed them at the best resolution, sprayed them, waited for 40 minutes.... than decided to check out Youtube.com as suggested at the very end of the instructions for more clarity.

A HA!!

When spraying these suckers you need to do it multiple times. Spray one coat and wait 30 seconds. Than spray a second coat. Wait 30 seconds than spray a third and wait 40 minutes. I just took the same decals (minus my regular white sugar decal that was still sitting in a washed out puddle) and sprayed them accordingly. And that did it. Awesome.


Supplies at the ready!


It works!!! 

I had my beautiful jars! And once you have all the supplies it's a snap to put them together. No, really. :) I love them and definitely much more than the storage jars that came with the husband. (Though they were great and very useful my love. They have a warm fuzzy spot in my heart because you smartly did them when I didn't even know you had to put stuff like that in storage to keep buys away... Thank you. I'm sure I will re-purpose them into something fantastic like a hat or waterslide... you never know with pinterest)

Old Hubby Jars


Now I did actually go to World Market to get that tiny little jar for my baking powder and found the two giant jars at The Container Store for $9.99 a pop. I mean I had put forth all that effort that I had to make them work as functional storage. I couldn't give up when I'd came so far.

By the way, did I mention I found a pack of labels at World Market's website this morning for $3.99?
Comical right? Mine are way better...


Never give up! Never Surrender!

God Bless,


Jessica


DIY Sewing Striped Curtains


I have a small problem... ok... it's a big problem. I. Love. Stripes.
Until now my stripe obsession has stayed safely within my wardrobe.
And seriously... It is quite a striped wardrobe. If it had stripes or pockets it was in my basket much to my bestie Megan's horror.

Yet, with a new house comes endless possibilities.
My stripe love didn't have to stay within my clothes... my windows needed some stripe love too!

Now on Pinterest you will see tons of do it yourself stripe curtains that are all about painting. You basically take a pair of Merete Curtains from Ikea ($24.99) some paint, painters tape and a few hours and they have beautiful striped curtains.

Logically if someone else can do it... of course I could give it a shot right?

I first decided I wanted to have red striped curtains after seeing this stunning photo from the Better Homes and Gardens website:


Since my living room accent color was red and eventually the walls will be painted Benjamin Moore's Revere Pewter I thought it would look fantastic! 

I dragged sweet love of my life Bryan to Ikea (joys of living in Texas now) and bought about five packs of those Merete Curtains since I planned on making quite a few curtains... eventually. Yet, as I began to explain my plan to Bryan about how to achieve these amazing (and of course EASY) curtains he sweetly pointed out a few holes in my plan... as only an engineer could.

1. I don't know about you but I have never painted a perfect stripe that didn't bleed... it is not my skill.
Amplify that bad skill by ten on curtains that you can't get paint out of if you mess up... Let's just not think about it.

2. Everything I do my 22 month old son Elliot NEEDS to help me with. He has this urge in him that if it looks like I need help he has to get right in it and help and combining that with paint... yea. Plus there was no way I could complete these bad boys while he napped. Unless I did it for a week and who wants open paint around your house for a week??

3. He just bought me a brand new Brother sewing machine... couldn't I just sew them?

DING!

Why couldn't I sew them? I love to sew! I do a semi-decent straight line... Let's do that!

First I pulled out my curtains. I used two packs which equaled four panels since I had a big window space to cover. (Three windows in all) I threw them in the wash so they would shrink than ironed them when they popped out of the dryer. Laid them over a banister to keep away wrinkles and figured out how wide I wanted my stripes.

I wanted four large red stripes so we figured a 16" stripe would be wide enough since Merete Curtains are 98" long. After they were washed they were about 96" which divided by 16 was now an even 6. Awesome. Now each panel after washing shrinks to 54" wide.

At this moment I would love for you to learn from my mistakes and trust me... I made them. And the first way to do it is when you are buying your fabric.

First let me tell you the breakdown:

To make 16" stripes on Merete Ikea Curtains you need to cut your fabric to this measurement for each stripe:
                                                      17"L x 57"W
That is putting a ½"on each side of your stripe to iron the hem plus almost an inch on each end of your width to fold it over the edge of the curtain and sew. Got that? This always trips me up... 

I found a red fabric that matched my accent sofa pillows. Now being married to an engineer becomes super helpful in this situation because the minute numbers come into sewing I panic like an indecisive chick at Starbucks. The red fabric I choose was only 36" wide so I had to go 57" deep and got two panels for each 57". Now, if you are smart you will have the nice people at Jo-Ann's cut your fabric to 57" so than all you have to do is cut the 17" panels. (To do two panels you need 3 - 57" cuts and it will make 6 stripes) Because cutting fabric is never super easy. It's doable but not always perfect, that's why you give yourself the extra around the edges.

I had them cut me all the fabric they had. Again cause I wasn't number savvy I had them cut it at 7 yards than 3 yards because they had to use two separate bolts. Stupid. I lost a 57" stretch in there between the 7 and 3 yards so I had to go buy more fabric. Fail. I was trying to use my Jo-Ann's coupon which didn't work anyway so from now if the fabric is already on sale I am just going to have them cut it to the measurements I need and save myself an hour of cutting.

| PRICECHECK: |
I bought about $80 worth of red fabric plus two Merete Curtains that came to $50.
To make my four panels it cost a whopping $130. Ouch.
Yet, considering I couldn't find these suckers anywhere and the cheapest ones on Etsy are $175 PER panel or $260 per set... I AM AWESOME and saved $570 and $390 respectively!! It is so important to put that price check in perspective throughout any project you undertake. It helps you sail through any speed bumps you may encounter. And knowing me... I am going to hit some. 

Once you have all your fabric cut you need to iron the hem on the stripes. I use this awesome idea from Martha Stewart (Oh Martha) that helps me make sure I am making a ½ hem. Ironing in relation to sewing is the ONLY time I enjoy ironing. It's instant gratification. Wrinkles be gone!

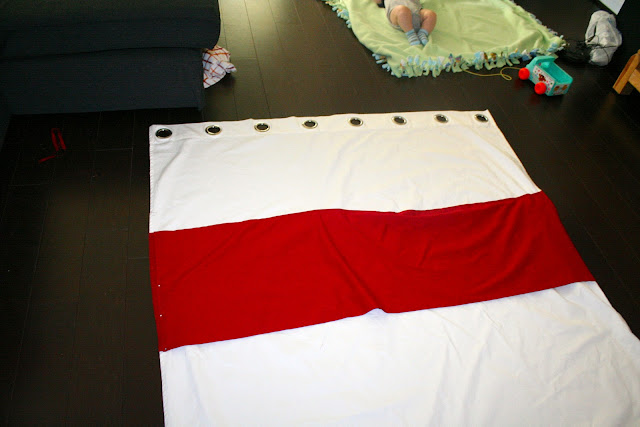
I laid out my ironed hem on my curtains and measured 16" down under the grommets. My husband and I thought we shouldn't count those four inches that contain the grommets. You should. It doesn't look bad but technically my first white stripe is now 20" and not 16". In the end it did add an extra 4" to my curtains which made them taller so that was an unexpected bonus. But the next time I do this... I'm going to include the 4" grommets in my measurements.

At first I tried to cheat on this project and just pin the ends of the fabric (Horizontally) and not all the way around. Who really has all that time to pin? This is what happened after I ran it through my sewing machine than laid it down to admire my handiwork...


You can laugh. I did. 
So I ripped that out and pinned the WHOLE thing. What I did was pin the top and the bottom of the stripe but NOT the sides. They shift a bit anyway when you sew so there is no point. 

You have to lay down your stripe and go across the curtain with your ruler to make sure it's the right measurement all the way across. Don't be lazy on this! If you feel like being lazy look again at the picture above and let that inspire you.

Sewing Tip: 
I have a regular Brother sewing machine and stuffing all that fabric in that tiny four inch whole... yea that ain't gonna cut it. After my massive fail above I figured out I should fold the curtain at four inches so the excess can fit in my little brother space. This will help you slide it through without shoving all the fabric in the little hole. Looks kind of like this: 


I measured between each red stripe 16" and pinned. After some sewing and more ironing I had my first completed panel!!


P.S. These won't fit on your ironing board... joy.

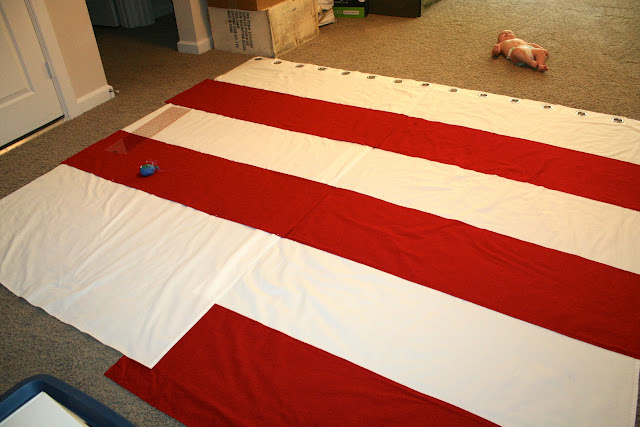
Now with one completed panel I took that upstairs, laid it down and used it as a reference to match up all my remaining panels. They needed to match semi-perfectly or they won't measure up when you hang them and having zig zag curtains when you weren't going for that effect will just depress you every time you pass them.


Look I even caught a cute baby in the picture!

This is a great picture. It shows you my extra four inches that were added by the last stripe. But it also shows you how you need to match them up. I laid them together and took out my ruler and started measuring. The first stripe was a perfect 16" under the grommets.
The second stripe... was 15 ⅝". Not really sure how that happened... but it didn't matter cause now they all were gonna be like that. You can't tell they aren't perfectly 16" can you? We couldn't either.
The third stripe by the way was even worse... it was 15 ½ down. Bahahaha.

Now this project... it did take me awhile. Like probably over two weeks but that was because I stop when my husband or kids want to play. If I would have pushed on with no distractions it would have taken probably a full day to do all four panels. But what fun is that?

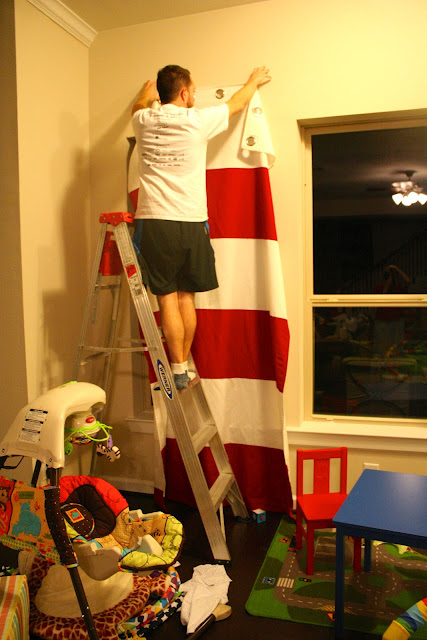
After they were finished I had my sweet hubby hang them up. This was him trying to figure out how high he needed to hang the curtain rod.


I sent a demo photo to my sister who immediately panicked and thought I was putting Dr. Seuss curtains in my living room. 


I showed her my inspiration photo and she felt a bit better... but it wasn't until I showed her the completed project that she believed I wasn't crazy. She and I have polar opposite tastes by the way so any kind thing she says about my decorating is a HUGE WIN. ;) 


So, there you have it. It isn't anywhere near being a completed room but the curtains give me a great start. Plus I fall in love with them every time I pass them which is always the mark of a great project. Do they have a few messed up edges and not so straight lines? Of course... but that's the character of it.

And for $130 bucks... it's still a fantastic deal my husband can be proud of.

Hope this helps! If you have any questions don't hesitate to ask!

God Bless,


Jessica