It started with this beauty I made when I was homesick for some NOLA charm in my Texas home.
Pottery Barn Knockoff for my friend Caron.
It hasn't stopped because they are so darn easy to make and you don't need to give me a really good excuse to go buy some wood from Home Depot.
So here is a quick tutorial so that you can make your own Custom Wooden Sign too.
Materials:
Design
Piece of Wood
Stain/paint
Pencil
Paintbrush & Acryllic paint
Sand paper (If you want to distress)
All of my signs (unless they are a custom commissioned piece) are 8"x25"
You can easily go to Lowe's or Home Depot and have them cut you a piece of wood that size. They don't carry them already cut so I go and get a six-foot board and have them trim them into four pieces. They are happy to do it so let them!
That's a sign for you, a sign for ya momma, a sign for a friend and an extra for you all for under $8.
At this point you can decide if you want to have a painted background for your sign or just stain it. I've done both and it's all about what look you are going for. You can paint from a can, spray paint, stain or even keep it natural. Your choice.
For this project I actually painted on a base coat of grey that I had a small pot of. I have a ton of tiny paint sample pots from trying to find house colors and I hate for them to go to waste. After a coat of gray I painted on a coat of white paint as I intend to distress the project at the end and want the gray to come through for a bit of an older look.
For the sign you'll need a design. I use a program called Pixlmater for all my design work. It was $15 but there are many free programs you can use if you just google it. I've used Pixlr.com before as well.
Create a new file to your board's dimensions so I made a file that was 8" high and 25" wide.
I than used this as my working space. Having the correct dimensions lets you know exactly how it will look and fit on your board.
I saw this design on Pinterest and it made me laugh so hard... because it's true... that I made a quick version for myself.
I print all my design images at Office Max and Office Depot. They have the printers to print large poster size and that works well with my 25" needs. I often use their 16" x 26" large format print in black and white for a wait for it... whopping $1.95. It's even cheaper if you get an 11"x17" it's $.25.
So once I have my design done I create another file that is 16" x 26" and drag my design into it.
This makes it easier for whoever is printing at the Office Max or Depot to actually print it correctly. You can also do two designs at once.
Sometimes they want to fit your design to page and blah blah... but if you bring it in on a flash drive to the correct printing size and say, "I need it that size, please don't touch it" it comes out perfect.
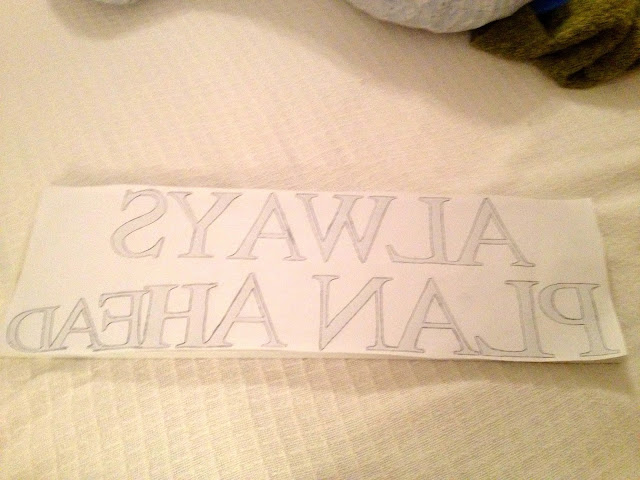
Once you have your freshly printed design at home you have two options depending on whether you painted your board or you stained it.
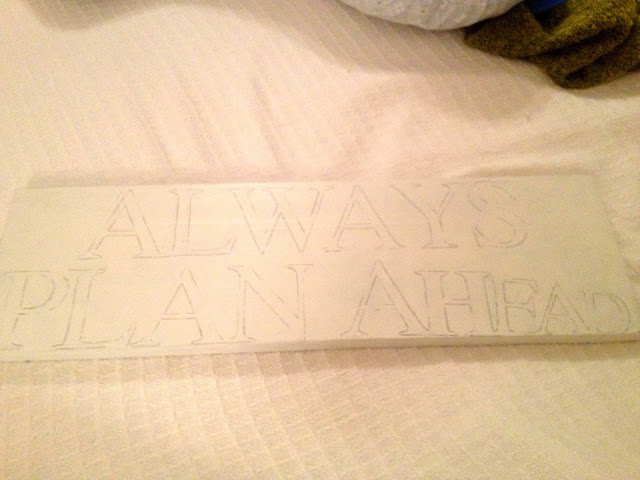
If you stained your board flip your image over and trace it hard with your pencil. Once that is done flip it back over, TAPE it to your board and trace all over again.
Once that is done flip it back over, TAPE it to your board and trace all over again.
The second trace will transfer the lead from the first trace onto the board and create a perfect
"Paint in these areas" for you to follow.
If you used paint (and I'm talking mostly about spraypaint since it's a thicker paint or did two coats like I did) you can skip the first tracing step and go onto the second.
It may not work that way (cause some crafts want to be a pain and cause an extra step...) so make sure you are checking your tracing by lifting up one corner
every once and a while
to make sure it is transferring. Nothing is more devastating than picking up the entire sheet to see you've missed a few letters... it's almost impossible to lay it back in the EXACT SAME spot.
to make sure it is transferring. Nothing is more devastating than picking up the entire sheet to see you've missed a few letters... it's almost impossible to lay it back in the EXACT SAME spot.
Trust me.
After that you get to paint!
I feel I am terrible at painting so I always take a piece of sand paper to the project after and rough it up a bit to hide my painting flaws.
Now you have your own custom wooden sign.
Go ahead... congratulate yourself.
You are awesome.
God Bless & Much Love,
Jessica
This is Linked up at Someday Crafts, The DIY Dreamer, The Shady Porch, Savy Southern Style, Making Home Base & Southern Lovely.

Party @ The Happie Housie


